Packet capture on ESXi host switchport
Get the port number:
net-stats -l
Capture the packets:
pktcap-uw --switchport <PortNum> --ng -o - --dir inputAndOutput | tcpdump-uw -r - -nLimit the number of packets captured with “-c”:
pktcap-uw --switchport 67108878 --ng -o - --dir inputAndOutput -c 100 | tcpdump-uw -r - -n
More info:
https://www.linkedin.com/pulse/accomplish-live-wireshark-captures-esx-host-nsx-t-ashwin
Initial Powershell setup on a new Windows 10 system
Set-ExecutionPolicy RemoteSigned -scope CurrentUser
iwr -useb get.scoop.sh | iex

scoop install git
scoop bucket add extras
scoop install pwsh
scoop install windows-terminal
scoop install vscode
scoop install fzf

Install-Module PowershellGet -Scope CurrentUser -Force -AllowClobber
Install-Module PsReadline -Scope CurrentUser -Force -AllowPrerelease
Install-Module PSFzf -Scope CurrentUser -AllowPrerelease

notepad $PROFILE

Set-PSReadLineKeyHandler -Key Ctrl+a -Function BeginningOfLine
Set-PSReadLineKeyHandler -Key Ctrl+e -Function EndOfLine
Set-PSReadlineKeyHandler -Key Tab -Function MenuComplete
Set-PSReadLineKeyHandler -Key Ctrl+d -Function MenuComplete
Set-PSReadLineKeyHandler -Key Ctrl+f -Function ForwardWord
Set-PSReadLineKeyHandler -Key Ctrl+b -Function BackwardWord
Set-PSReadLineKeyHandler -Key Ctrl+z -Function Undo
Set-PSReadLineKeyHandler -Key UpArrow -Function HistorySearchBackward
Set-PSReadLineKeyHandler -Key DownArrow -Function HistorySearchForward
Set-PSReadlineOption -HistorySearchCursorMovesToEnd
Set-PSReadLineOption -BellStyle None
Set-PSReadLineOption -PredictionSource History

Import-Module PsFzf
Set-PsFzfOption -PSReadlineChordProvider Ctrl+t -PSReadlineChordReverseHistory Ctrl+r
Enable-PsFzfAliases

function hist {Get-Content (Get-PSReadLineOption).HistorySavePath | Get-Unique}
Set-Alias -Name which -Value "$env:SystemRoot\System32\where.exe"
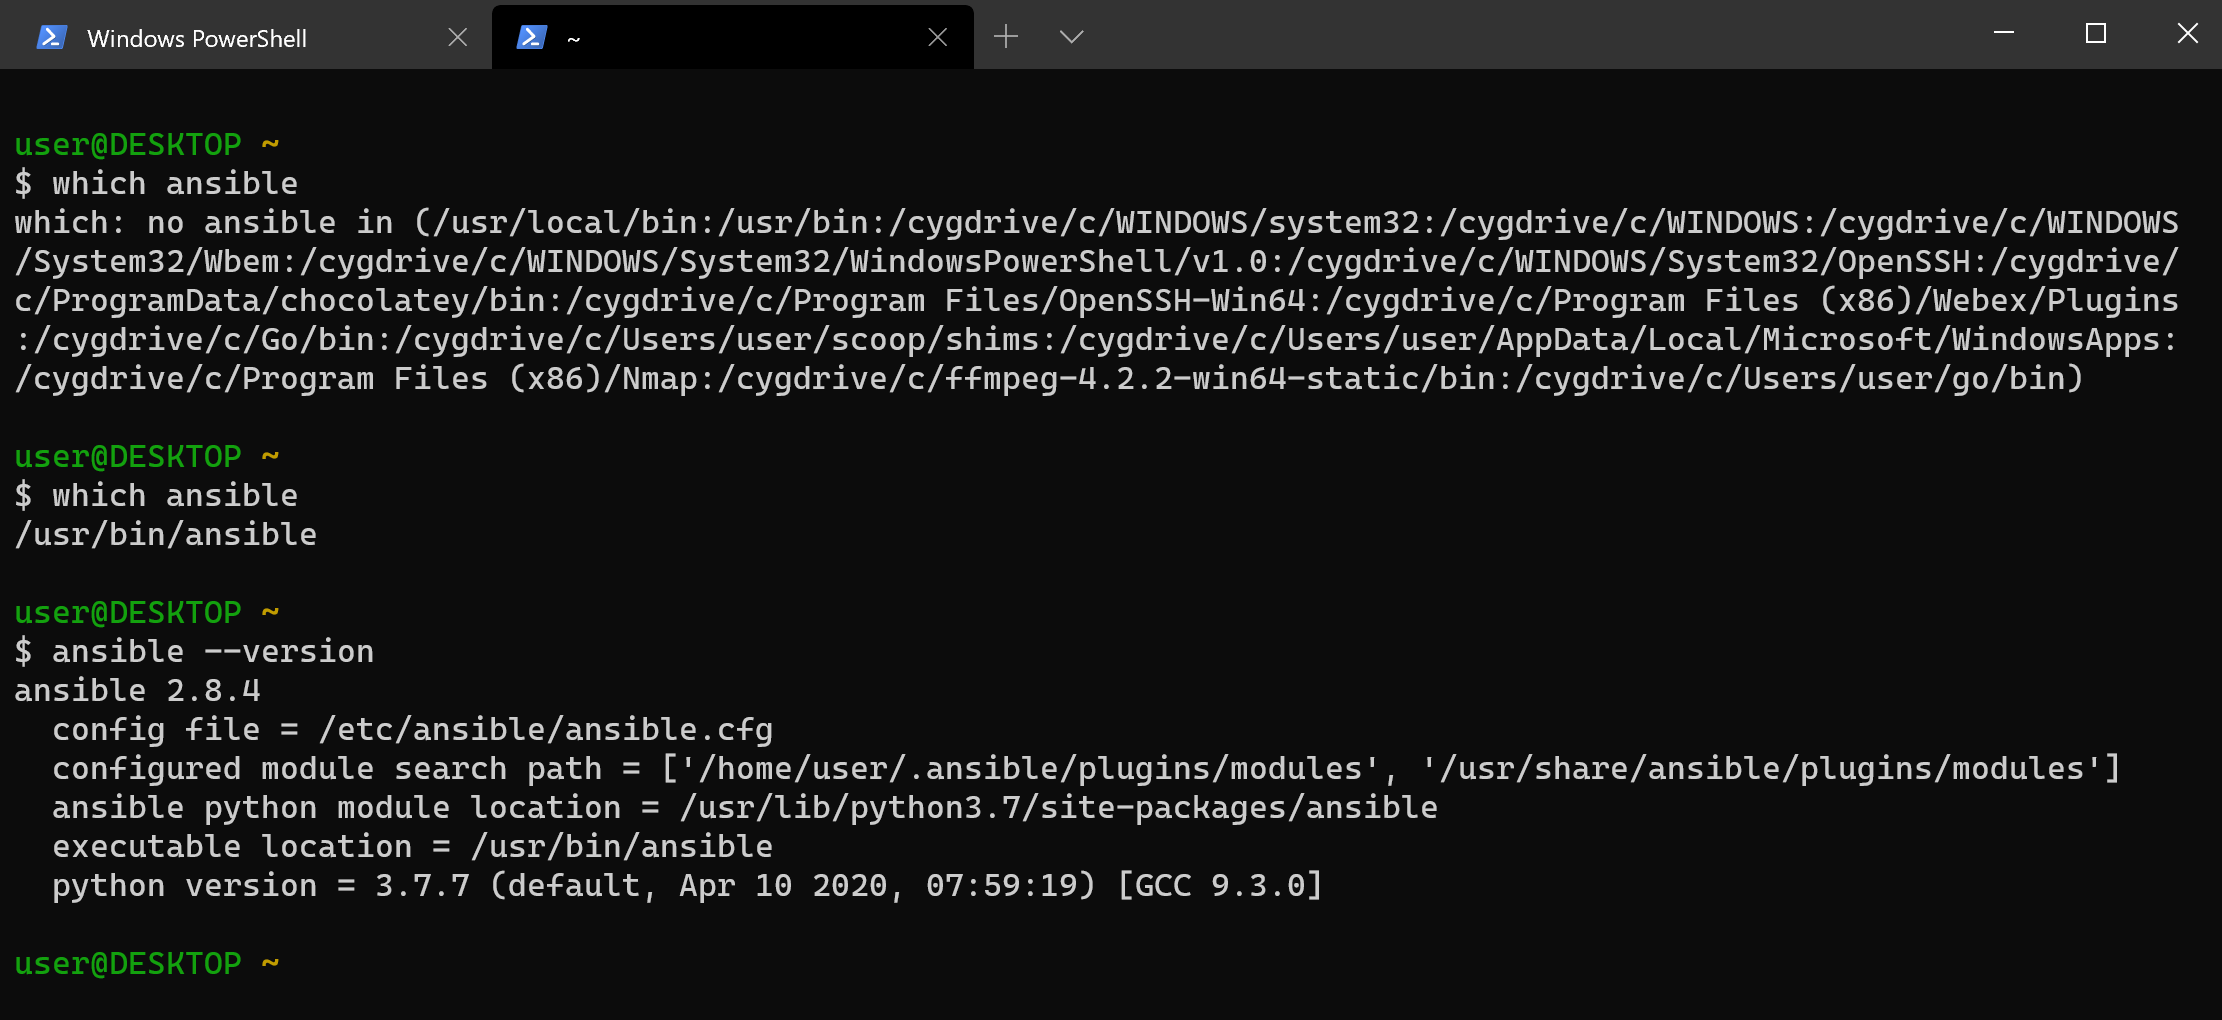
A quick way to install Ansible on Windows 10
Ansible is not officially supported to run on Windows, but there are ways to get it installed on this OS. Some people run in in a virtual machine under Virtualbox or VMware Workstation, or using WSL.
But it seems that the quickest way to get it running is to use Cygwin. This also allows installs on systems where you don’t have admin rights.
1. Use a package manager to install Cygwin. Here I use Scoop.
iwr -useb get.scoop.sh | iex
scoop install cygwin
2. Once Cygwin is installed, install Ansible:
~\scoop\apps\cygwin\current\cygwin-setup.exe -qnBP ansible
That’s it!
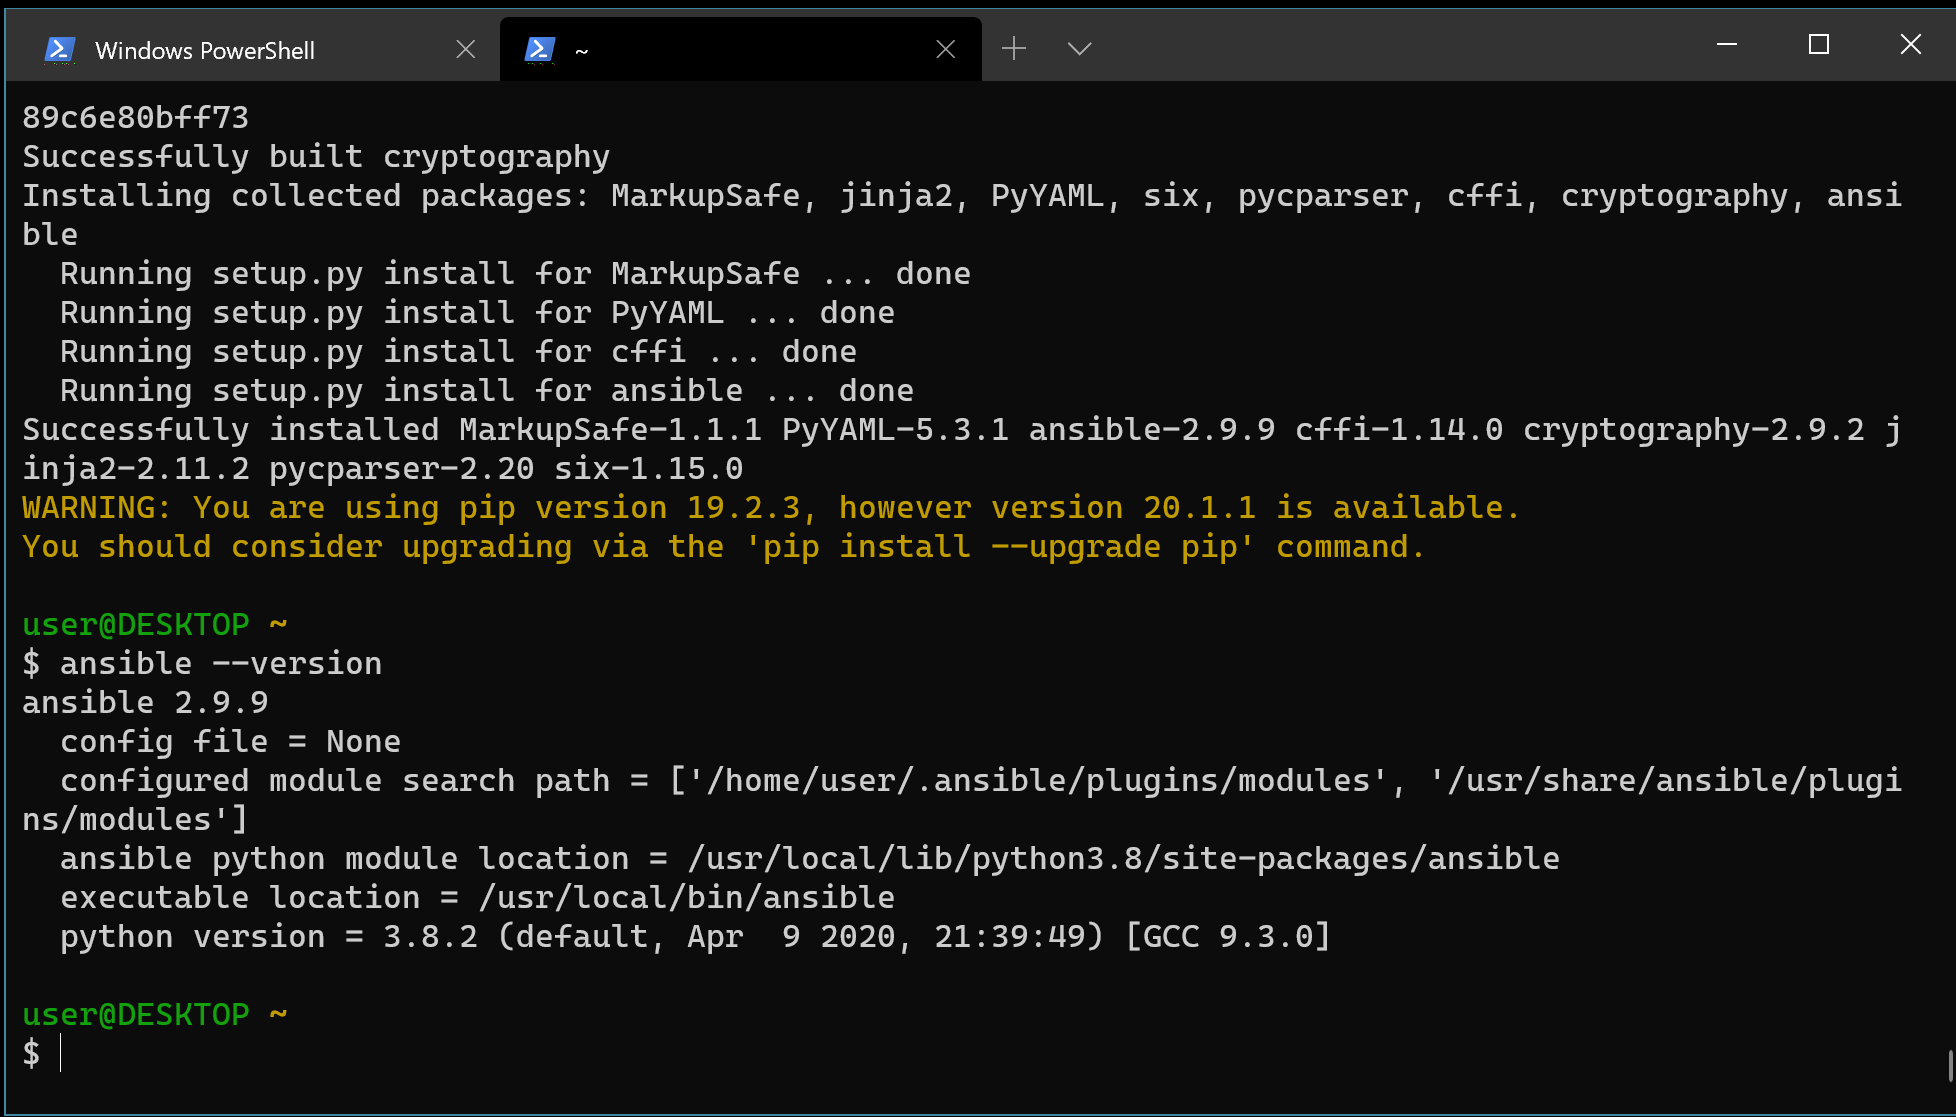
The Ansible version from Cygwin repository might be a bit behind the current one, so you can compile the latest one yourself. If you already have done the install above, for the best result you may want to start from scratch, because of possible issues with dependencies.
Reinstall cygwin:
scoop uninstall cygwin
rm -r -fo ~\scoop\persist\
scoop install cygwin
Once cygwin is reinstalled, you need to install dependencies:
~\scoop\apps\cygwin\current\cygwin-setup.exe -qnBP gcc-core,python38-pip,python38-devel,libffi-devel,libssl-devel,openssh
Finally, compile ansible in your new cygwin shell (this might take a while):
python3.8.exe -m pip install ansible
Cloning Ubuntu 18.04 LTS cloud image on VMware, using cloud-init
This entry is inspired by Myles Gray’s posts “Using cloud-init for VM templating on vSphere” and “Creating an Ubuntu 18.04 LTS cloud image for cloning on VMware”. I’ve experienced the same issues as the author while trying to combine cloud-init and VMware customizations using DataSourceOVF and had to use workarounds from https://kb.vmware.com/s/article/54986.
Most annoyingly, I’ve hit https://bugs.launchpad.net/cloud-init/+bug/1835205 on clone reboots, which increased the clone boot times by 90 seconds. It looks like Myles finally gave up on cloud-init since he’s suggesting to just purge it from the template and go with the VMware legacy perl customization engine. I believe another reason for this is his usage of govc to manipulate the template, and govc does not have facilities to manipulate vApp properties. vApp properties customization is needed when using cloud-init with OVF data source.
VMware does have a project – https://github.com/vmware/cloud-init-vmware-guestinfo – that will allow to use guestinfo properties to inject user_data into the vApp, but it is not yet upstreamed into the cloud-init. So I’ve decided to just embrace cloud-init’s DataSourceOVF for now and keep VMware customization disabled. This approach also allows to automatically customize VMs that are not supported by VMware customization engine (Debian 10, for example).
Deploy Ubuntu 18.04 cloud image OVA
$src = "https://cloud-images.ubuntu.com/releases/bionic/release/ubuntu-18.04-server-cloudimg-amd64.ova"
$ova = "ubuntu-18.04-server-cloudimg-amd64.ova"
Start-BitsTransfer -Source $src -Destination $ova
Import OVA into vSphere:
$name = "ubuntu1804template"
$vmhost = get-vmhost | select -First 1
$network = "<portgroup_name>"
$ds = get-datastore -Name "<datastore_name>"
$dsf = "thin"
$ovfConfig = Get-OvfConfiguration $ova
$ovfConfig.NetworkMapping.VM_Network.Value = $network
Import-VApp -Source $ova -VMHost $vmhost -OvfConfiguration $ovfConfig -datastore $ds -DiskStorageFormat $dsf -name $name
Ubuntu cloud image is now deployed and powered off. We can use vSphere Web Client to examine vApp properties that will be used by cloud-init on the first boot to customize the VM (VM->Configure->vApp Options). Notice that OVF environment transport is set to ISO Image. Once VM is powered on, vSphere will create a small ISO and will attach it to VM for cloud-init to read it’s values.
Workflow
In general, the workflow would look like this:
- Deploy the unconfigured Ubuntu cloud image OVA (done above)
- Clone the cloud image into a working template VM using “template_user_data” cloud-init file, which will update the packages, inject ssh keys, and perform other customizations such as setting an NTP server.
- Use the working template as a clone source to provision new VMs with another “user_data” cloud-init file with will further customize the VM (for example, you can use Myles Gray’s “user_data” for Kubernetes cluster setup).
I wrote a small Powershell script that can be used to clone the VM, attach the user-data file, and change the instance-id to force cloud-init to run the customization. We would also need to get an additional script from William Lam, which provides a couple of functions – Get-VMOvfProperty and Set-VMOvfProperty – to manipulate vApp properties.
Start-BitsTransfer https://raw.githubusercontent.com/vmsysadm/scripts/master/vmclone-init.ps1
Start-BitsTransfer https://raw.githubusercontent.com/lamw/vghetto-scripts/master/powershell/VMOvfProperty.ps1
Source the scripts:
. .\VMOvfProperty.ps1
. .\vmclone-init.ps1
I use a simple user-data file to update the packages and inject the ssh keys into the template at first boot, but cloud-init provides a very extensive configuration capabilities.
Start-BitsTransfer https://gist.githubusercontent.com/vmsysadm/727fb3a855f904664a54f0d3002f0e7e/raw/1f6232475634dc9e69d630db54bc63ea1fba961c/template_user_data
Now you can use all this to prepare the template for the initial setup.
Cloning from base template
vmclone-init $name .\template_user_data base_image_01
This creates a new base_image_01 template which is an updated version of the original ubuntu1804template with ssh keys and other modifications from template_user_data cloud-init file. The same vmclone-init command now can be used to clone additional VMs off the base_image_01 with further modifications from a different user_data file. For example, you can use Myles Gray’s “user_data” for Kubernetes cluster setup.
Troubleshooting
/var/log/cloud-init-output.log is available with cloud-init execution steps, or your can run “cloud-init analyze show -i /var/log/cloud-init.log” to check the execution times. “cloud-init analyze blame -i /var/log/cloud-init.log” is also helpful. Note that some modules are set up with frequency “always”, so cloud-init does run on each reboot but since the instance-id does not change and the cache is present in /var/lib/cloud, it does not perform the customization. You can check which modules are set to always run with “cloud-init analyze dump -i /var/log/cloud-init.log | grep -i always”. To force cloud-init to perform re-customization, you can either change the instance-id in vApp properties or do “rm -rf /var/lib/cloud”, per https://git.launchpad.net/cloud-init/tree/doc/sources/ovf/README.
Getting started with govc on Windows
govc is a vSphere CLI that provides an interface to vSphere API. I’ve found that most govc guides are using Linux or MacOS, so here are a few points on using govc on Windows 10.
The easiest way to install govc is to get it from Chocolatey PS repository, although it may be a version or two behind the latest. You might want to get it from GitHub instead if being on a current version is important to you. The following commands are run in Powershell.
Install Chocolatey repository:
Set-ExecutionPolicy Bypass -Scope Process -Force; iex ((New-Object System.Net.WebClient).DownloadString('https://chocolatey.org/install.ps1'))
Install govc and jq (jq is a json processor, which comes handy in parsing values returned by govc):
choco install govc
choco install jq
Optionally, install VMware PowerCLI and adjust PowerCLI variables:
install-module vmware.powercli
Set-ExecutionPolicy RemoteSigned
Set-PowerCLIConfiguration -ParticipateInCEIP $false
Set-PowerCLIConfiguration -InvalidCertificateAction Ignore
Create credential store for vCenter authentication:
$vcenter = "<your_vcenter_fqdn>"
$cred = get-credential
New-VICredentialStoreItem -Host $vcenter -User $cred.username -Password $cred.GetNetworkCredential().password
govc uses environment variables to set up the session:
$env:GOVC_URL="https://"+$vcenter
$env:GOVC_USERNAME=(Get-VICredentialStoreItem $vcenter).User
$env:GOVC_PASSWORD=(Get-VICredentialStoreItem $vcenter).Password
$env:GOVC_INSECURE="true"
$env:GOVC_DATASTORE="<datastore_name>"
$env:GOVC_NETWORK="<portgroup_name>"
$env:GOVC_RESOURCE_POOL='*/Resources'
To print your session GOVC variables, you can run the following (note that the password will be in plaintext, no way around it as far as I know):
ls env:GOVC*
Now you should be able to run govc to interface with vCenter API:
govc about
govc about -json | jq '.'
Command reference: https://github.com/vmware/govmomi/blob/master/govc/USAGE.md
Some functionality is not yet implemented. For example, the ability to manipulate vApp properties is still missing.
Some useful commands:
govc import.ova -name ubuntu1804template-orig .\ubuntu-18.04-server-cloudimg-amd64.ova
govc vm.change -vm ubuntu1804template-orig -c 1 -m 1024 -e="disk.enableUUID=1"
govc vm.clone -on=false -vm ubuntu1804template-orig ubuntu1804template-test
govc vm.power -on=true ubuntu1804template-test
govc vm.destroy ubuntu1804template-test
Note that govc is not expecting Windows text file format, and you may see the following error if you try to feed it with a json file edited in notepad on Windows. For example:
govc import.ova -options=C:\ubuntu.json .\Downloads\ubuntu-18.04-server-cloudimg-amd64.ova
C:\ProgramData\chocolatey\lib\govc\tools\x64\govc.exe: invalid character ‘ÿ’ looking for beginning of value
You will need to convert your json file to unix format using some tool like dos2unix
.\dos2unix.exe -n C:\ubuntu.json C:\ubuntu2.json
How to enable vRealize Automation 7 Orchestrator Control Center service
When you install vRealize Automation 7, on the main web interface you’re greeted with a bunch of links, one of them is “vRealize Orchestrator Control Center (the service is stopped by default)”. There is absolutely no documentation from VMware on how to start the service.
To start the Control Center, you need to ssh into the appliance, log in as root, and run “/etc/init.d/vco-configurator start”.
Powershell script to permanently enable ssh on all ESXi hosts and supress SSH warning
A small script to permanently enable ssh on all ESXi hosts and supress SSH warning.
$vcenter = "vc"
Connect-VIServer -Server $vcenter

$host_regexp = "esx0[1-2]"
$key = "TSM-SSH"
$policy = "on"

$hosts = Get-View -ViewType "HostSystem" -Property Name |
    Select-Object -ExpandProperty name | where {$_ -match $host_regexp} | sort

foreach ($h in $hosts) {
  $service = Get-VmHostService -VMHost $h | where {$_.key -eq $key}
  $_this = Set-VMHostService -HostService $service -Policy $policy
  $_this = Start-VmHostService -HostService $service
  $_this = Set-VMHostAdvancedConfiguration -VMHost $h UserVars.SuppressShellWarning 1
  Write-Host "enabled" $service "on" $h
}
Adding vmkernel interfaces to Nexus 1000v distributed switch with VMware powercli
Recently I faced a task where I needed to add vmotion and nfs vmkernel interfaces to a large number of ESXi 5 hosts that were attached to the Cisco Nexus 1000v distributed switch. In the field, due to the lack of time, we resorted to programmatically creating vmkernel interfaces on the standard virtual switch and then manually migrated them to the Nexus 1000v. Later I decided to create a powershell script that would streamline this task and create vmk interfaces on the Nexus 1000v directly.
This rather simple script takes a number of variables in the header, then creates the vmk interface (it automatically assigns the next available vmk number, i.e. if you already have vmk0 on the host, it will create vmk1). The script can enable vmotion on vmknic, and set the mtu. $hosts_regexp variable allows to narrow down the list of hosts to run the script against (for example, we had management hosts that did not need the new interfaces). Set the switch name, the portgroup name, and the IP with the last octet to starting IP of the new interface.
$vc=’vc’
$switch=’n1000v’
$portgroup=’data-uplink’
$ip=”10.0.0.”
$lastoct=44
$netmask = “255.255.255.0”
$mtu=1500
$hosts_regexp=[regex]”esx0(0[1-9]|1[0-4])”
$vmotion=$false
$conn = Connect-VIServer $vc
$hosts = get-vmhost
$hosts = $hosts -match $hosts_regexp | sort
foreach ($h in $hosts) {
$vmhost = Get-VMHost $h
$netsystem = Get-View $vmhost.Extensiondata.ConfigManager.networkSystem
$vnicmanager = Get-View $vmhost.Extensiondata.ConfigManager.virtualNicManager
$switchuuid = ($netsystem.NetworkInfo.ProxySwitch | where {$_.DvsName -eq $switch}).DvsUuid
$dvportgroupkey = (Get-VirtualPortGroup $vmhost | where {$_.Name -eq $portgroup}).Key
$nic = New-Object VMware.Vim.HostVirtualNicSpec
$nic.ip = New-Object VMware.Vim.HostIpConfig
$nic.ip.dhcp = $false
$nic.ip.ipAddress = $ip + $lastoct
$nic.ip.subnetMask = $netmask
$nic.mtu = $mtu
$nic.distributedVirtualPort = New-Object VMware.Vim.DistributedVirtualSwitchPortConnection
$nic.distributedVirtualPort.switchUuid = $switchuuid
$nic.distributedVirtualPort.portgroupKey = $dvportgroupkey
$vmk = $netsystem.AddVirtualNic(“”, $nic)
if ($vmotion) {$vnicmanager.SelectVnicForNicType(“vmotion”, $vmk)}
Write-Host $vmhost,”added”,$vmk,$nic.ip.ipAddress,$nic.ip.subnetMask,”mtu”,$nic.mtu,”vmotion”,$vmotion
$lastoct++
}
The second script will remove the vmk interface, in case you need to change something or start from scratch.
$vc=”vc”
$vmk=”vmk1″
$hosts_regexp=[regex]”esx0(0[1-9]|1[0-4])”
$conn = Connect-VIServer $vc
$hosts = get-vmhost
$hosts = $hosts -match $hosts_regexp | sort
$conn = Connect-VIServer $vc
foreach ($h in $hosts) {
$vmhost = Get-VMHost -Name $h
$netsystem = Get-View $vmhost.Extensiondata.ConfigManager.networkSystem
$netsystem.RemoveVirtualNic($vmk)
Write-Host $vmhost,”removed”,$vmk
}
Resolving Linux boot issues after P2V with VMware Converter
Recently I had to deal with migrating SuSE Enterprise Linux servers from the old environment to the Vblock. Customer had a number of physical servers and XEN instances that needed to be moved to the new vSphere environment.
While VMware Converter 5 does a good job live-cloning the existing Linux servers, sometimes you have to use the Cold Clone boot CD if the physical server uses software RAID (and then boot VM from the broken mirror side), or sometimes the resulting VM does not boot because of issues with bootloader.
For the most migrations I’ve used VMware Converter 5.0. One thing you need to do right away is to modify the config for VMware Converter to enable the root login and keep the failed helper VM. Enable useSourcePasswordInHelperVm flag and disable powerOffHelperVm. See http://kb.vmware.com/kb/1008209 for details.
Now you should have the result of your failed conversion preserved, and should be able boot the VM to check why the failure have occurred.
There are a few reasons why the conversion can fail at 99% while reconfiguring the OS. It could be because the disk path had changed, kernel modules are missing, or grub is not finding stuff.
Originally my XEN conversions were failing at 99% with FAILED: An error occurred during the conversion: ‘GrubInstaller::InstallGrub: Failed to read GRUB configuration from /mnt/p2v-src-root/boot/grub/menu.lst’. This problem is related to the fact that XEN instances do not have /boot/grub/menu.lst in place.
To fix this and or any other bootloader issues, grab your favorite Linux rescue disk and boot the VM from it. Since I was converting SLES, I’ve used SLES 10 SP2 boot CD, and booted into “Rescue System”. Alternatively, you can attach the converted vmdk to an existing Linux VM.
Once booted into the rescue, check the present disks with “fdisk -l“. Most likely, your devices are now showing up as /dev/sdaX, since the disk controller was changed to VMware LSI Logic Parallel.
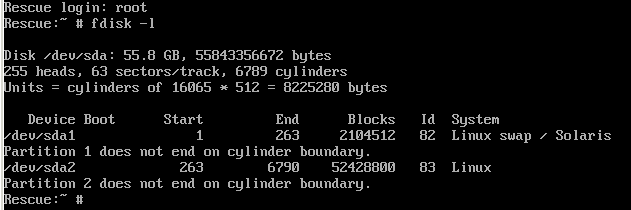
Mount your new /dev/sda2 partition as /mnt, add /dev, and chroot into it.
# mount /dev/sda2 /mnt
# mount –bind /dev /mnt/dev
# cd /mnt
# chroot .
Once chrooted into your old environment, fix the /etc/fstab to use /dev/sdaX for your boot and swap, instead of whatever path you have there (XEN instances were booting from /dev/xvda2).
Next step is to make sure that the required kernel modules for VMware virtual machine support are loaded from the ramdisk. If piix and mptspi modules are missing, you will get “Waiting on /dev/sda2 device to appear…” message at boot.
On SLES, the location to define the ramdisk kernel modules is in /etc/sysconfig/kernel file.
The following modules should be present (remove unused stuff like “xenblk”):
INITRD_MODULES=”piix mptspi processor thermal fan jbd ext3 edd”
Once the INITRD_MODULES line is fixed, run “mkinitrd” to re-create the ramdisk.
# mkinitrd
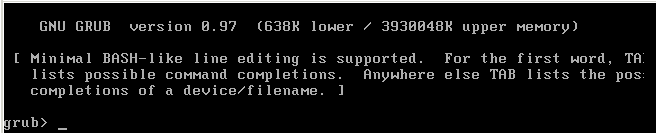
In case the bootloader’s /boot/grub/menu.lst file is missing, you can specify the kernel and initrd parameters at boot time (use TAB to complete the filenames for your smp kernel).
grub> kernel /boot/vmlinuz-2.6.16.60-0.21-smp root=/dev/sda2
grub> initrd /boot/initrd-2.6.16.60-0.21-smp
grub> boot
Alternatively, use the menu.lst file below.
###YaST update: removed default
default 0
timeout 8
##YaST – generic_mbr
gfxmenu (hd0,1)/boot/message
##YaST – activate
###Don’t change this comment – YaST2 identifier: Original name: linux###
title SUSE Linux Enterprise Server 10 SP2
kernel (hd0,1)/boot/vmlinuz-2.6.16.60-0.21-smp root=/dev/sda2 repair=1 resume=/dev/sda1 splash=silent showopts vga=0x314
initrd (hd0,1)/boot/initrd-2.6.16.60-0.21-smp
###Don’t change this comment – YaST2 identifier: Original name: failsafe###
title Failsafe — SUSE Linux Enterprise Server 10 SP2
kernel (hd0,1)/boot/vmlinuz-2.6.16.60-0.21-smp root=/dev/sda2 showopts ide=nodma apm=off acpi=off noresume edd=off 3 vga=normal
initrd (hd0,1)/boot/initrd-2.6.16.60-0.21-smp
VM should be able to boot now.
Check 30-net_persistent_names.rules file in /etc/udev/rules.d directory for any network adapter changes that might need to be done. It is likely that udev detected the network hardware change and added eth1 to this file. Remove duplicate entries, leaving only the last one and change eth1 to eth0.
Don’t forget to install VMware Tools once the VM is up and running.
Using Perc 5i with ESXi 5
Perc 5i is a Dell’s rebranded LSI SAS1078 RAID on Chip (ROC). You can use LSI firmware on it, since it’s essentially the same card as MegaRAID SAS 8480E.
Installing MegaCli and LSI SIM adapter in ESXi 5
Go to http://www.lsi.com => “Support” => “Support Downloads by Product” and search for 8480E. On 8480E page search for “MegaCLI”. Download MegaCli package, copy the executable from VMware folder to your host’s persistent storage (use your local vmfs datastore; do not use the root partition – it uses tmpfs to minimize the writes to the flash media and the file will disappear after the reboot).
Get the firmware from the same page (search for “Firmware”). 7.0.1-0083 was current as of Dec. 08 2011. Extract mr1068fw.rom to your host’s persistent storage.
Search http://www.lsi.com for “SMIS Provider” and download “SAS MegaRAID VMWare SMIS Provider VIB (Certified) for ESXi 5.0”, extract the vib file to your host’s persistent storage.
Install the vib from SMIS Provider package:
# esxcli software vib install -v ./vmware-esx-provider-LSIProvider.vib
Try to run MegaCli:
# ./MegaCli -AdpAllInfo -aALL | more
If it complains about libstorelib.so missing, you need to copy it from ESX 4 host and place in the same directory as MegaCli. See http://http://communities.vmware.com/thread/330535 for details. Alternatively, you can get it here: http://db.tt/aEYFL6CQ.
Shut down all VMs on the host and flush the controller’s firmware:
# ./MegaCli -adpfwflash -f mr1068fw.rom -a0
Adapter 0: PERC 5/i Adapter
Vendor ID: 0x1028, Device ID: 0x0015
Package version on the controller: 7.0.1-0075
Package version of the image file: 7.0.1-0083
Download Completed.
Flashing image to adapter…
Adapter 0: Flash Completed.
Exit Code: 0x00
Reboot the host.
After the reboot, you should see the LSIProvider vib is installed:
# esxcli software vib list | grep -i lsi
LSIProvider 500.04.V0.24-261033 LSI VMwareAccepted 2011-11-30
From the 8480E product page, you can download the “MegaRAID Storage Manager” for your preferred OS to connect to the SIM adapter and manage the controller. The version I tried was “Windows – 4.6”, build 11.06.00-03 from Aug 11, 2011. It failed to discover the adapter.
I then tried the MSM from MegaRAID SAS 9285-8e page (Windows – 5.0 – 10M12, Version: 9.00-01 from Mar 11, 2011), and it was able to discover and connect to the controller. The Storage Management software is rather slow, buggy, and crash-prone on Windows 7, but I was able to create a logical drive and change the caching policies on the existing VDs.
MSM uses TCP port 5989, so be sure to allow that in your ESXi firewall (just enable CIM secure server).
If you have a problem discovering the ESXi host in MSM, watch http://www.youtube.com/watch?feature=player_detailpage&v=mEBwt6Q_diU#t=479s. You need to stop the local discovery, then go to “Configure Host” and select “Display all the systems in the network of local server”.
